 |
| Soil Moisdcture Sensor (fc-28) |
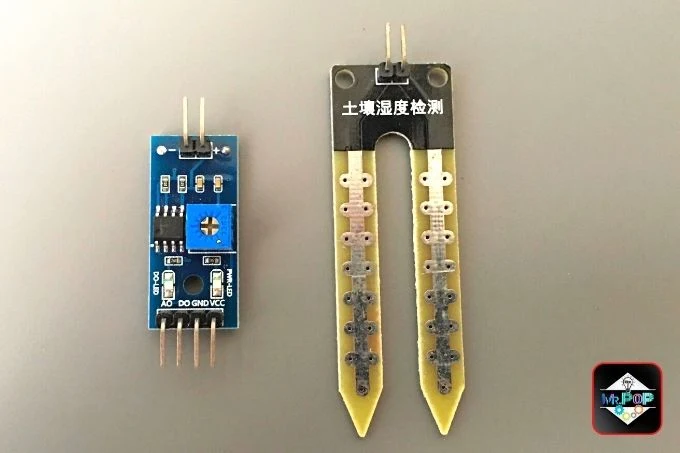
Soil Moisture Module
What is soil moisture module?
Working of soil moisture module?
Using this information, we can determine the soil moisture level.
A sensor can output either Analog or Digital data. In analog mode, the range is from 0 to 1023, while in digital mode, the range is 0 or 1.
NOTE: We can increase or decrease sensitivity of a sensor by adjusting its potentiometer. As you rotate clockwise, sensitivity increases, while rotating counterclockwise, sensitivity decreases.
Soil Moisture sensor as Analog:
Now, we can verify the soil conditions.
If the sensor reading is high, the red led will turn on and print the message on serial monitor. but if the reading is low, the green led will turn on and print the message on serial monitor.
The code waits every 200 milliseconds each time it runs.
soil moisture sensor arduino.Soil Moisture sensor module specification:
| Soil Moisture sensor | Values |
|---|---|
| 1. Working Voltage | 2.3v to 5v DC |
| 2. Working Current | < 20mA |
| 3. Output Mode | Digital or Analog |
| 4. Sensor PCB | 3.2 CM * 1.6 CM |
| 5. Sensor Probes | 6 CM * 2 CM |
Aplication of Soil Moisture sensor module:
- Smart Plant system
- Liquid level detection
- Botanical gardening
- Flood detection
- Irrigation planning
- Environmental science
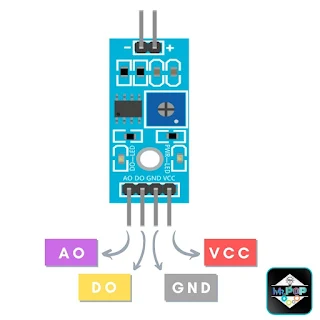
Soil Moisture sensor module Pinout:
| pins | Description |
|---|---|
| 1. AO pin | Its give us analog output, the range is from 0 to 1023. |
| 2. DO pin | Its give us digital output, the range is 0 or 1. |
| 3. GND | Gound and its voltage is zero. |
| 4. VCC | Its power supply for the sensor. |
Component Requirements:
1. Arduino uno
2. Soil moisture sensor
3. LED x 2
4. 220Ω Resistor x 2
5. Jumper Wire.
6. BreadBoard.
Since soil moisture works both ways, we will learn its code as both analog and digital.
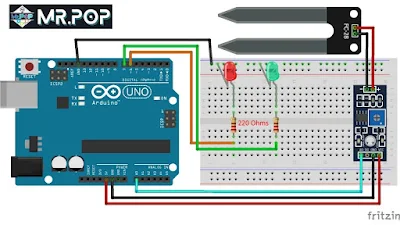
1. First, we need to connect soil moisture sensor with arduino uno.
- Connect the FC-28 sensor AO to pin 12 of the Arduino
- Connect the FC-28 sensor GND to pin GND of the Arduino.
- Connect the FC-28 sensor VCC to pin 5v of the Arduino
2. LEDs are used for indicating the moisture in the soil. RED leds indicate dried soil and green leds indicate wet soil.
- The pin of the red LED is connected to pin 6 of the Arduino through a resistor.
- The pin of the green LED is connected to pin 7 of the Arduino through a resistor.
A 220-ohm resistor is use to protect LEDs from high currents.
The circuit has now been completed.
3. Let's get started with coding.
3. Let's get started with coding.
4. Launch the Arduino IDE.
Calibration:
Firstly, we need to determine the threshold value of dry and wet soil. For that, just copy and paste the following code onto the Arduino IDE.int soilSensor = A0;
int sensorValue;
void setup() {
pinMode(soilSensor, INPUT);
Serial.begin(9600);
}
void loop() {
sensorValue = analogRead(soilSensor);
Serial.print(sensorValue);
delay(200);
}
1. Connect the arduino uno to PC via usb cable.
2. In the arduino software goto tool --> then select your board and COM port.
3. Upload the code.
4. After uploding is successfully, open the serial monitor. There are two values we need to note.
- Put the sensor probe into dry soil and note the value.
- Put it into wet soil and note the value.
We will use this value as a threshold value. Add this reading to dryReading and wetReading in the code below.
Soil Moisture sensor code in arduino:
int soilSensor = A0;
int greenLed = 6;
int redLed = 7;

int sensorValue;
int moistLevel;

int dryReading = 780;
int wetReading = 300;

void setup() {
  pinMode(soilSensor, INPUT);
  pinMode(greenLed, OUTPUT);
  pinMode(redLed, OUTPUT);

  Serial.begin(9600);
}

void loop() {
  sensorValue = analogRead(soilSensor);
  Serial.print(sensorValue);

  moistLevel = map(sensorValue, dryReading, wetReading, 0, 100 );
  if (moistLevel > 50) {
    Serial.println(" Moisture level is Cool...feeling (: ");
    digitalWrite(redLed, LOW);
    digitalWrite(greenLed, HIGH);
  } else if (moistLevel > 90) {
    Serial.println(" Too much water! ");
    digitalWrite(redLed, LOW);
    for (int i; i < 10; i++) {
      digitalWrite(greenLed, HIGH);
      delay(200);
      digitalWrite(greenLed, LOW);
      delay(200);
    }
  }
  else if (moistLevel < 50) {
    Serial.println(" I Need Water the soil is dry out! :( ");
    digitalWrite(redLed, HIGH);
    digitalWrite(greenLed, LOW);
  }
  delay(500);
}
Soil Moisture sensor Code Explanation:
The first thing we need to do is define the sensor as an analog pin and the LEDs as digital pins.
int soilSensor = A0;
int greenLed = 6;
int redLed = 7;
A sensor reading is stored in the sensorValue and moistLevel variables.From a calibration code, we get this threshold value. It's used for determining soil condition.
The dry soil reading is 780, and the wet soil reading is 300.
int dryReading = 780;
int wetReading = 300;
In setup() function, we need to set the sensor as input, Since we're getting readings from the sensor and LEDs as a output after that, we need to set the baud rate at 9600 for serial communication.pinMode(soilSensor, INPUT);
pinMode(greenLed, OUTPUT);
pinMode(redLed, OUTPUT);
Serial.begin(9600);
Using loop() function, the code repeat again and again. Then, we get the sensor readings with analogRead() and stored them in sensorValue and also print it on serial monitor.sensorValue = analogRead(soilSensor);
Serial.print(sensorValue);
The map() function is used to convert the sensor reading into percentage by wrapping sensorValue, dryReading, wetReading and stored it on moislLevel variable.moistLevel = map(sensorValue, dryReading, wetReading, 0, 100 );
When the moisture level exceeds 50, the green led will turn on and print the message on serial monitor.
The code waits every 500 milliseconds each time it runs.
if (moistLevel > 50) {
Serial.println(" Moisture level is Cool...feeling (: ");
digitalWrite(redLed, LOW);
digitalWrite(greenLed, HIGH);
}When the moisture level exceeds 90, the green led will blink for 10 times and print the message on serial monitor.
else if (moistLevel > 90) {
Serial.println(" Too much water! ");
digitalWrite(redLed, LOW);
for (int i; i < 10; i++) {
digitalWrite(greenLed, HIGH);
delay(200);
digitalWrite(greenLed, LOW);
delay(200);
}
}When the moisture level is less than 90, the red led will turn on and print the message on serial monitor.
else if (moistLevel < 50) {
Serial.println(" I Need Water the soil is dry out! :( ");
digitalWrite(redLed, HIGH);
digitalWrite(greenLed, LOW);
}The code waits every 500 milliseconds each time it runs.
delay(500);
Soil Moisture sensor as digital:
It is the same circuit as above, with the only difference being the sensor DO pin is connected to pin 5 on the Arduino.
Calibration:
Firstly, we need to set the threshold value for dry soil. To do this, we need to place the sensor probe in dry soil and rotate its potentiometer clockwise or counterclockwise until the sensor led lights up. SO we can understand that the soil is dry out.
Soil Moisture sensor code in arduino:
int soilSensor = 5;
int greenLed = 6;
int redLed = 7;
int sensorValue;
void setup() {
pinMode(soilSensor, INPUT);
pinMode(greenLed, OUTPUT);
pinMode(redLed, OUTPUT);
Serial.begin(9600);
}
void loop() {
sensorValue = digitalRead(soilSensor);
if (sensorValue == HIGH)
{
Serial.println(" I Need Water the soil is dry out! :( ");
digitalWrite(redLed, HIGH);
digitalWrite(greenLed, LOW);
} else {
Serial.println(" Moisture level is Cool...feeling (: ");
digitalWrite(greenLed, HIGH);
digitalWrite(redLed, LOW);
}
delay(500);
}Soil Moisture sensor Code Explanation:
On the start, first we have to define the sensor and leds as a digital pins. Values of a sensors are stored in the sensorValue variable.
int soilSensor = 5;
int greenLed = 6;
int redLed = 7;
int sensorValue;
In Void setup(), the code run once, then set the LED as an OUTPUT and the soil sensor as an INPUT, because we getting reading from the sensor after that, begin serial communication at 9600 baud.
pinMode(soilSensor, INPUT);
pinMode(greenLed, OUTPUT);
pinMode(redLed, OUTPUT);Serial.begin(9600);In the void loop(), the code repeat again and again.
As we connected the sensor on digital pin so we need read it with digitalRead() function which reads the value from an sensor and stores it on a variable called sensorValue.
sensorValue = digitalRead(soilSensor);
if (sensorValue == HIGH)
  {
    Serial.println(" I Need Water the soil is dry out! :( ");
    digitalWrite(redLed, HIGH);
    digitalWrite(greenLed, LOW);
  } else {
    Serial.println(" Moisture level is Cool...feeling (: ");
    digitalWrite(greenLed, HIGH);
    digitalWrite(redLed, LOW);
  }
delay(500);Soil Moisture sensor Project Tutorial:
LinKs:
how to test sensors.
arduino sensor test.
sensor test.


Post a Comment