|
| Hc-sr04 Ultrasonic sensor |
HC-SR04 Ultrasonic Sensor Module
Hello friends, In my blog I will show you how to create a connection between a hc-sr04 ultrasonic sensor and the Arduino board and here you can also find the introduction, working principle, applications, specificatoins, pinout & explanation, circuit diagram, test code, code explanation, Video Tutorial and data sheet of the ultrasonic sensor.
what is the ultrasonic sensor?
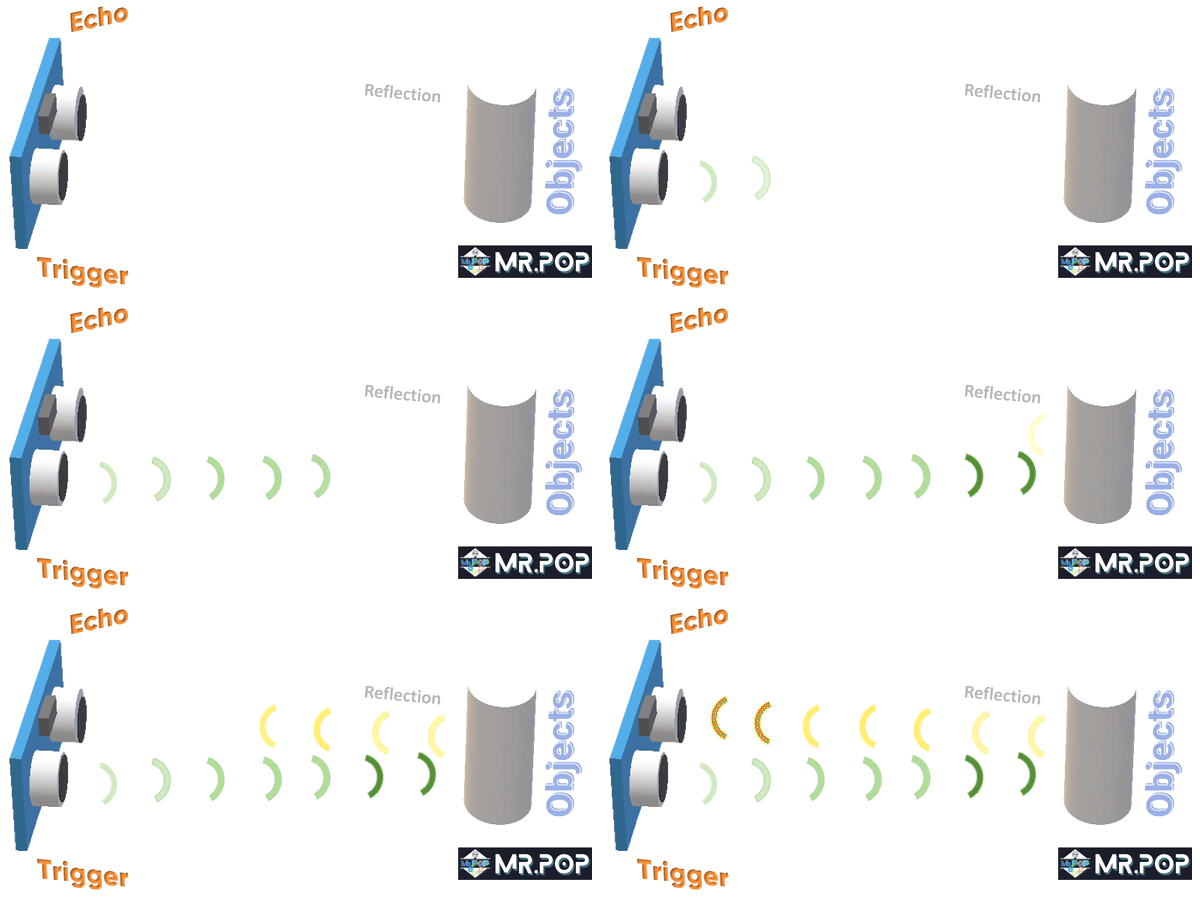
An utrasonic sensor is a proximity sensors, which is used to measure the distance without making contact with objects as they emit ultrasound waves and When an object detects a wave, it reflects it to the receiver. Calculating the distance to an object is possible by measuring the amount of time taken between transmitting and receiving the signal. Sensors can detect distances between 2 cm to 400 cm.It can be used with a variety of microcontrollers like Arduino, raspberry pi, esp8266, Teensy and other.
Working of Ultrasonic sensor?
Ultrasonic sensors transmit the signal by trigpin and receive it by
echopin. It transmits the frequency of 40khz by trigger pin and when
it detects an object, the sound signals reflects back to
echopin. Calculating the distance to an object is based on the duration
between the transmission and reception of the signal.
Formula: Distance = Speed x
Time
Hc-sr04 Specifications:
| Hc-sor4 sensor | Values |
|---|---|
| 1. Operating Voltage | 5V DC |
| 2. Operating Current | 15mA |
| 3. Measuring Distance | 2 to 450 cm |
| 4. Accuracy | 3mm |
| 5. Measuring Angle Covered | 15 degree |
| 6. Frequency | 40Hz |
| 7. Dimension | 45 x 20 x 15mm |
Aplication of Hc-sr04 ultrasonic sensor:
- Water Level detector.
- Obstacle avoid robot.
- path-finding robots.
- Measures distance like a scale.
- HC-SR04 security alarm alerts you by sounding a buzzer when anyone approaches it.
- Rotating the sensor allows mapping objects surrounding it.
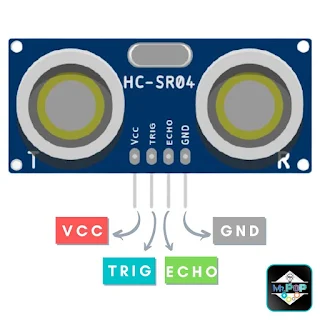
Hc-sr04 Pinout:
Component Requirements:
1. The Arduino Uno is the brian of the projects.
2. Hc-sr04 ultrasonic sensor is used to measure distance.
3. LEDs are used as indicators.
4. A resistor of 220 ohm is used to protect the led from high
currents.
5. The jumper wire and breadboard are used to make the
connection.
- Connect Arduino 5v pin to breadboard positive side.
- Connect Arduino GND to the breadboard GND side.
2. Make the connection between the Hc-sr04 ultrasonic sensor and
the Arduino uno.
- Connect the Hc-sr04 GND to pin GND of the Arduino.
- Connect the Hc-sr04 VCC to pin 5v of the Arduino
- Connect the Hc-sr04 TrigPin to pin 12 of the Arduino
- Connect the Hc-sr04 EchoPin to pin 13 of the Arduino
3. A 220-ohm resistor should be connected to the positive pins of the
LEDs to protect them from
high currents.
- Connect the resistor end to pin 11 of the Arduino.
The circuit has now been completed.
4. Let's get started with coding.
4. Let's get started with coding.
5. Launch the Arduino IDE.
Hc-sr04 Utrasonic Sensor Arduino Code:
1. The first thing you need to do is install the NewPing library./*
* Posted on https://www.mrelectrouino.com/
* Follow us on Instagram: _mr_electrouino_
*/
#include <NewPing.h>
#define TRIGGER_PIN 12
#define ECHO_PIN 13
#define MAX_DISTANCE 400
#define Led 11
// NewPing setup of pins and maximum distance.
NewPing sonar(TRIGGER_PIN, ECHO_PIN, MAX_DISTANCE);
float distance;
void setup()
{
	Serial.begin(9600);
	pinMode(Led, OUTPUT);
}
void loop()
{
// Send ping, get distance in cm
distance = sonar.ping_cm();
Serial.print("Distance = ");
if (distance >= 400 || distance <= 2)
{
	Serial.println("Out of range");
}
else if (distance < 20){
digitalWrite(Led, HIGH);
Serial.println("Object is detected");
}
else{
digitalWrite(Led, LOW);
Serial.print(distance);
Serial.println(" cm");
}
delay(500);
}
2. You will need a USB cable to connect the Arduino Uno to the
computer.
3. Goto tool --> Board --> Arduino AVR board --> Select your Arduino board.
4. Goto tool --> port --> select your port
5. The code is now ready to be upload.
6. Once the code has been uploaded, go to the serial monitor and check the values.
3. Goto tool --> Board --> Arduino AVR board --> Select your Arduino board.
4. Goto tool --> port --> select your port
5. The code is now ready to be upload.
6. Once the code has been uploaded, go to the serial monitor and check the values.
Hc-sr04 Code Explanation:
The library provides a simple way to get the distance from the sensor. To use its benefits, we must include it.#include <NewPing.h>
You should also define the led that should be connected to arduino pin
11.
Initialize an ultrasonic device, to use pin 12 as trigger output, pin
13 as echo input, with a maximum distance of 200 cm.
A distance variable is defined as a float that is used to store distance
values.
The setup() function executes the code once. Serial.begin() is used to
initialize serial communication to display results on the serial
monitor. We need to set its baud rate to 9600. The baud rate should be
set to 9600. Also set the Led as a output.
#define TRIGGER_PIN 12
#define ECHO_PIN 13
#define MAX_DISTANCE 400
#define Led 11
NewPing sonar(TRIGGER_PIN, ECHO_PIN, MAX_DISTANCE);
float distance;
void setup()
{
Serial.begin(9600);
pinMode(Led, OUTPUT);
}
distance = sonar.ping_cm();
if (distance >= 400 || distance <= 2)
{
Serial.println("Out of range");
}
else if (distance < 20) {
	digitalWrite(Led, HIGH);
	Serial.println("Object is detected");
} else {
	digitalWrite(Led, LOW);
	Serial.print(distance);
	Serial.println(" cm");
}
Wrapping up:
I hope this information helps you to test the ultrasonic sensor
(hc-sr04) by arduino uno. If you have any problem free feel to
comment it. Will reply it as soon as possible.
Thank you for reading!
HC-sr04 Project Tutorial:
LinKs:
Arduino ultrasonic sensor led projectsHc-sr04 Datasheets.
Fritzing: Hc-sr04 Ultrasonic sensor.
Hc-sr04 Ultrasonic sensor test.
arduino sensor test.
how to test sensors


Post a Comment